Trace Paths |
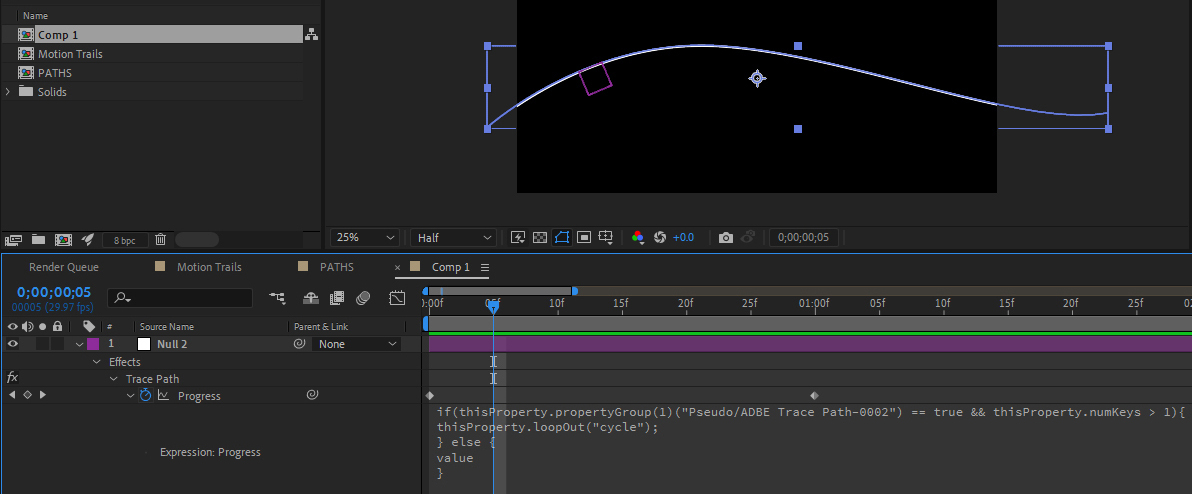
ADD A TRACE PATH: In a Comp that is 1080p in size and 10 seconds long, draw a line using the Pen Tool that arcs across the scene left to right. In the Timeline select the Path and open the Contents arrow and below that the Shape and Path 1 twirl downs. Select Path so all 3 are highlighted. While selected, go to the Window menu along the top white menu bar and locate Create Null From Paths.jsx at the bottom. Select it. Chose the Trace Path option from the pop-up. This will create a new Null Object and place it on the path, and use the Path as a Motion Path. Scroll the Timeline Cursor to see the results. In the Timeline, select the Null Object and open the effects track to find the Trace Path Progress parameter (as shown above.) Highlight the entire set of script lines that start with "if(thisProperty..." and ends with the } bracket and delete all of it. This will stop the effect from looping. Create a Shape Layer (Circle or Star) or import your choice of footage that will follow the Null. While the new Shape Layer is selected, go to Menu > Layer > Transform > Center Anchor Point in Layer Content. Click the Pickwhip of the Shape Layer and hold Shift while dragging down to the name of the Null layer. This will snap the shape layer to the Null Path. Scroll timeline to see results. To speed up or slow down the results, move the 2nd keyframe as necessary. ADD A GROWING TAIL TO THE FLYING FOOTAGE: Add a Trim Path to the Line track. Open the Trim Path track and Pickwhip the End Value to the Null's Progress track. This will create a visible Motion Trail that emerges from the animated Shape. NOTE: You can use this approach to slave a Particular Particle emitter to that same Null Progress Track. To do so, open the Emitter section in the Particular Effects Control Panel and choose the (now renamed) Null layer in the drop-down menu for the property "Linked Null." |